

The Essential Guide to Homemade Soy Wax Candles (2025)
Imagine walking into your living room, greeted by the warm glow and soothing aroma of candles you crafted yourself. The sense of pride and relaxation that comes from homemade soy wax candles can transform any space into a cozy retreat.
In this essential guide for 2025, you’ll discover everything you need to know to create homemade soy wax candles right in your own kitchen. Whether you’re a beginner or a seasoned DIY enthusiast, you’ll find tips and tricks to make your candle-making journey enjoyable and rewarding.
Ready to fill your home with personalized scents, eco-friendly ambiance, and beautiful creations? Let’s dive in and explore why soy wax is the top choice, what tools you’ll need, and how to craft stunning candles with ease.
Why Choose Soy Wax for Homemade Candles?
When it comes to making homemade soy wax candles, choosing the right wax makes all the difference. Soy wax stands out as a plant-based, renewable, and biodegradable option that leaves a lighter footprint on the planet.
Here’s a quick comparison to highlight why soy wax is a favorite among candle makers:
| Wax Type | Burn Quality | Soot/Toxins | Eco-Friendliness | Scent Throw |
|---|---|---|---|---|
| Soy | Clean | Low | High | Excellent |
| Paraffin | Moderate | High | Low | Moderate |
| Beeswax | Clean | Low | Moderate | Subtle |
Soy wax burns cleaner than paraffin, producing less soot and no harmful toxins. It supports sustainable agriculture, reduces environmental impact, and is non-toxic—making it a top choice for families with children or pets. According to the National Candle Association, 60% of eco-conscious consumers prefer soy candles. Interested in learning more about these benefits? Explore this Vegan Soy Wax Candles Guide.
Homemade soy wax candles are also budget-friendly and easy to source, making them perfect for DIY projects. Their excellent scent throw means your favorite fragrances fill the room beautifully. Plus, soy wax’s lower melting point makes candle making safer and extends burn time, so you can enjoy your creations even longer.
Essential Tools and Materials for Soy Candle Making
Starting your journey with homemade soy wax candles begins with gathering the right tools and materials. Having everything ready makes the process smoother and more enjoyable.
Essential Tools Checklist:
- Double boiler or dedicated melting pot
- Thermometer for precise temperature control
- Stirring utensil (silicone or stainless steel)
- Pouring pitcher
- Heat-resistant containers
Choosing the best soy wax is key. Flakes melt quickly and are easy to measure, while blocks are more economical for larger batches. Organic wax offers peace of mind, but conventional options are widely available.
| Soy Wax Type | Pros | Cons |
|---|---|---|
| Flakes | Easy to use, quick melt | Slightly higher cost |
| Blocks | Cost-effective | Harder to cut/measure |
| Organic | Chemical-free | Pricier, less common |
| Conventional | Affordable | May contain additives |
Wicks come in cotton and wood varieties. Select the right size for your container to ensure an even burn. Test a few to find what works best for your homemade soy wax candles.
Fragrance oils should be high-quality and phthalate-free. Look for candle-safe scents that complement your style. Dyes can be natural or synthetic; stir thoroughly for even color.
Safety is vital. Wear gloves and an apron, and set up your workspace away from pets and kids. Good ventilation is a must.
When sourcing materials, check local craft stores or reputable online suppliers. For more guidance, see these Soy Candle Wax Sourcing Tips to find the best wax for your needs.
Many crafters swear by Golden Brands 464 soy wax for reliable, smooth results every time.
Investing in quality tools and materials sets you up for candle making success and ensures your creations look and smell amazing.
Step-by-Step Guide to Making Soy Wax Candles
Ready to dive into the world of homemade soy wax candles? Follow this simple guide to master every stage, from prepping your workspace to testing your final creations. Making candles at home is not just rewarding, it’s also a creative journey where you control every detail. If you want even more detail, check out this excellent Beginner Candle Making with Soy Wax resource for extra tips and visuals.
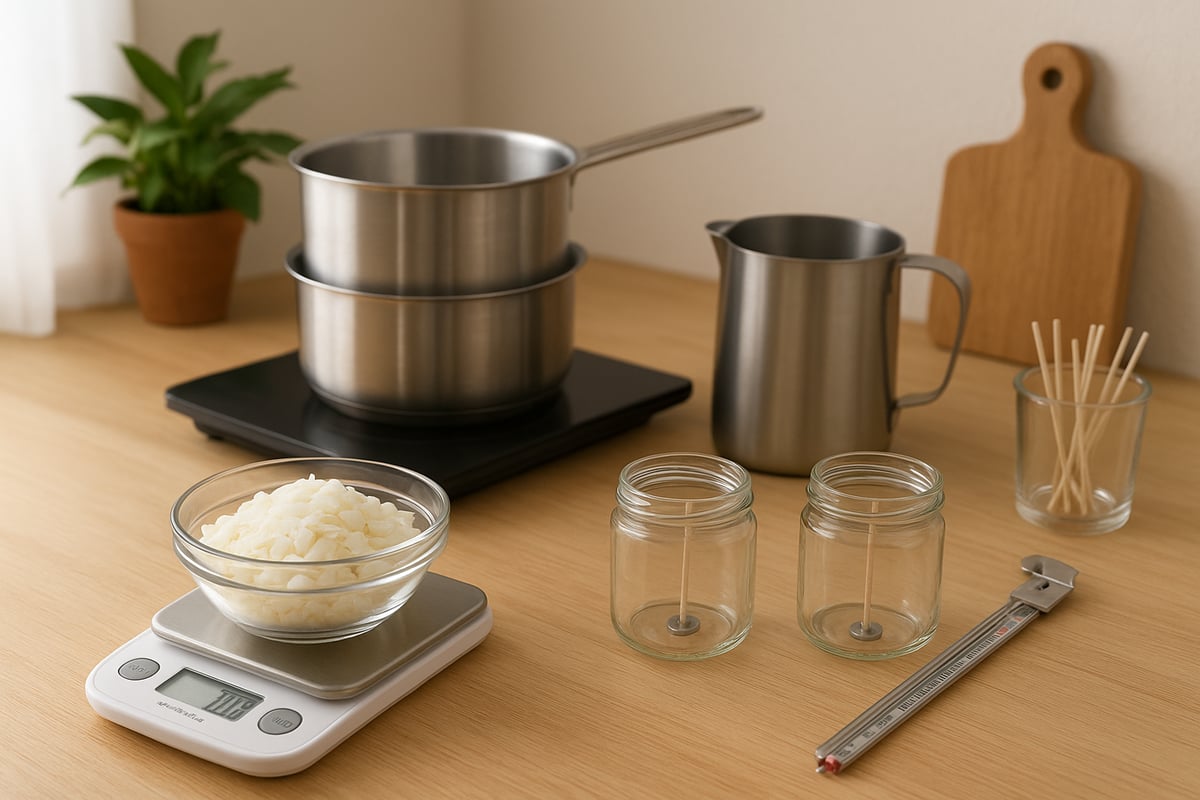
Preparing Your Workspace and Materials
Start by cleaning and organizing your workspace to ensure safety and efficiency. Gather all the tools and ingredients you’ll need for homemade soy wax candles, including a double boiler, thermometer, stirring utensil, pouring pitcher, and heat-resistant containers.
Set up your containers and use a hot glue gun to anchor the wicks firmly at the base. Keep a kitchen scale handy for precise measurements, which is crucial for consistent results. Double-check that all your materials are within reach before you begin. Creating an orderly environment helps you focus on the creative aspects of homemade soy wax candles and minimizes the risk of spills or accidents.
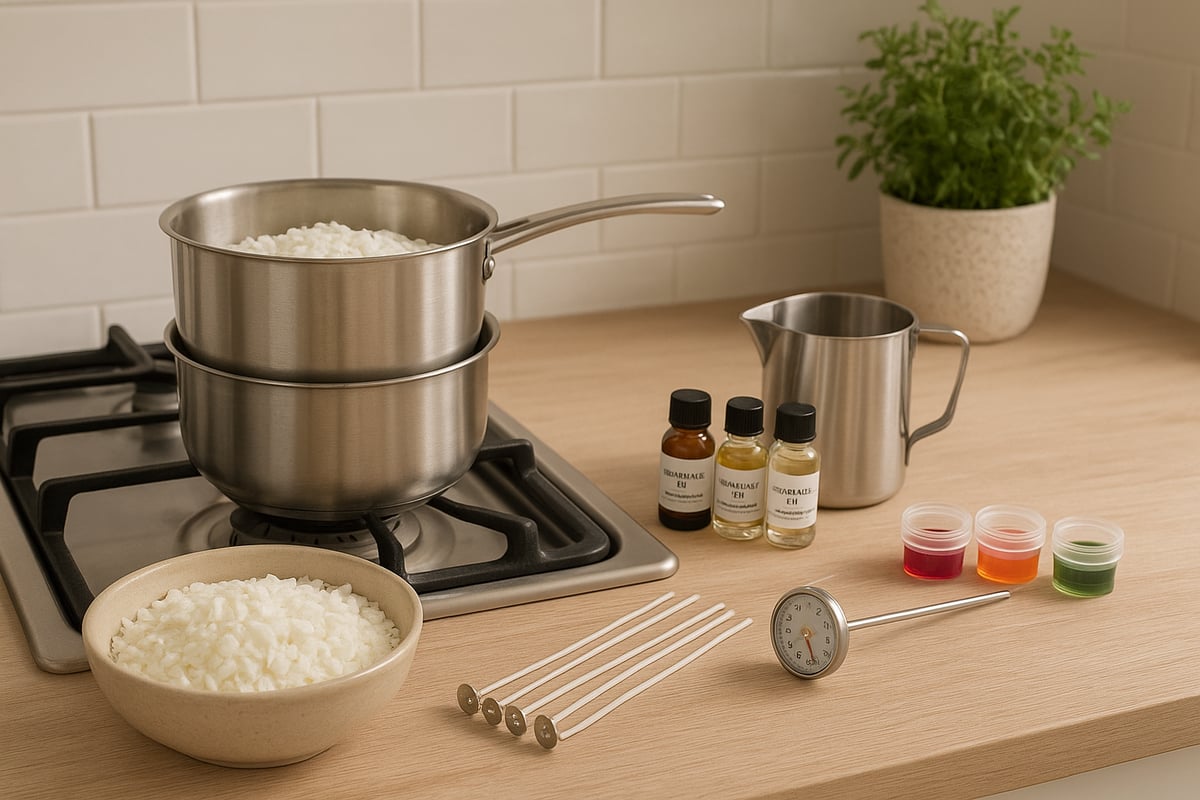
Melting and Mixing the Soy Wax
Measure out the correct amount of soy wax for your chosen containers. Place the wax in a double boiler to gently melt it, avoiding direct heat to prevent scorching or uneven melting.
Keep a close eye on the temperature with a thermometer, aiming for an ideal range of 170 to 185°F. Stir the wax occasionally for a smooth, even consistency. Remember, overheating can lead to frosting or loss of scent in your homemade soy wax candles, so patience pays off here.
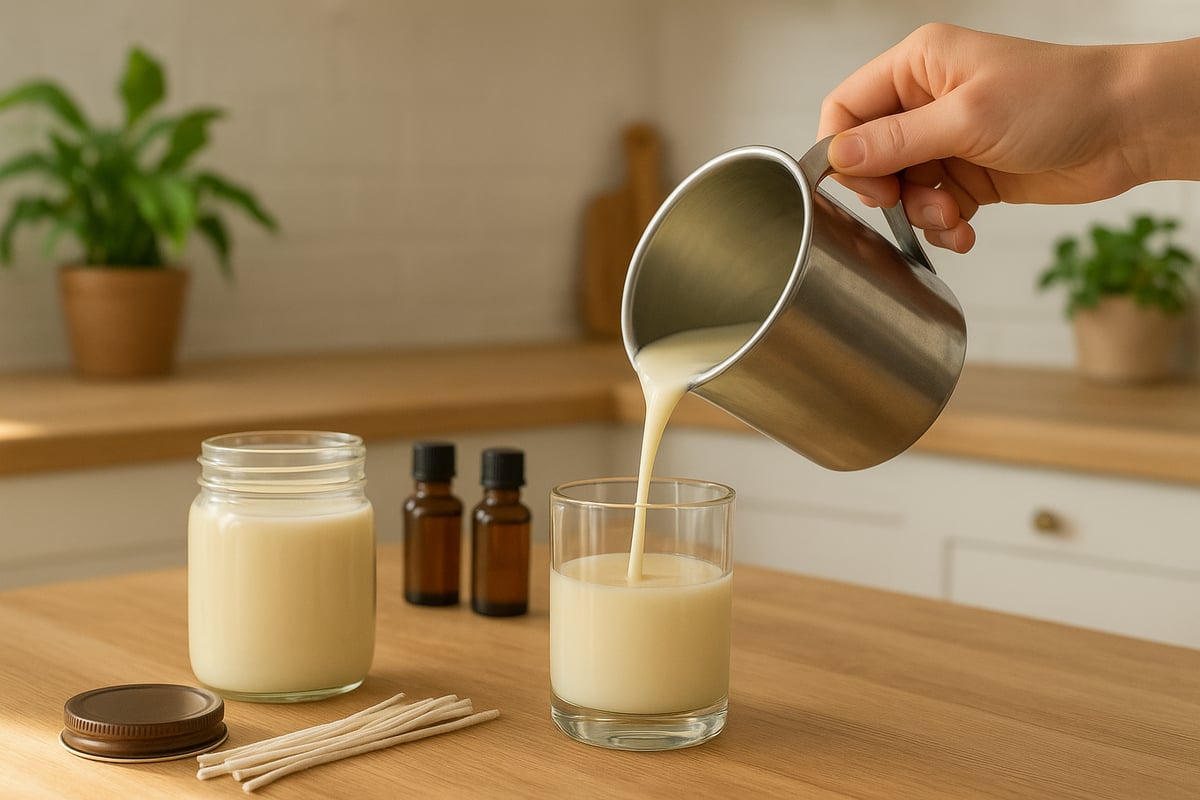
Adding Fragrance and Color
Once your wax has fully melted, remove it from the heat before adding any fragrance oils. The recommended fragrance load for homemade soy wax candles is typically 6 to 10 percent by weight.
Stir the mixture thoroughly for at least two minutes to ensure the scent is evenly distributed throughout the wax. If you’re adding colorants, mix them in at this stage, making sure they dissolve completely. For example, for a 16 oz candle, use about 1 oz of high-quality fragrance oil to achieve a strong, pleasant scent.
Pouring and Setting the Candles
Allow the wax to cool to between 135 and 145°F before pouring it into your containers. Pour slowly and carefully to avoid air bubbles.
Center and stabilize your wicks as the wax sets, ensuring they remain upright. Let the candles cool undisturbed for several hours, then trim the wicks to about ¼ inch for optimal burning. This careful process ensures a smooth surface and even burn in your finished candles.
Curing and Testing Your Candles
Cure your candles for one to two weeks to develop their best scent and burn qualities. Test burn each candle to check wick performance, scent throw, and overall appearance.
Record your results and make adjustments to future batches as needed. Store your finished candles away from direct sunlight to preserve their color and fragrance. A proper curing process can boost scent strength by up to 30 percent, making your candles even more enjoyable.
Customizing Your Soy Wax Candles
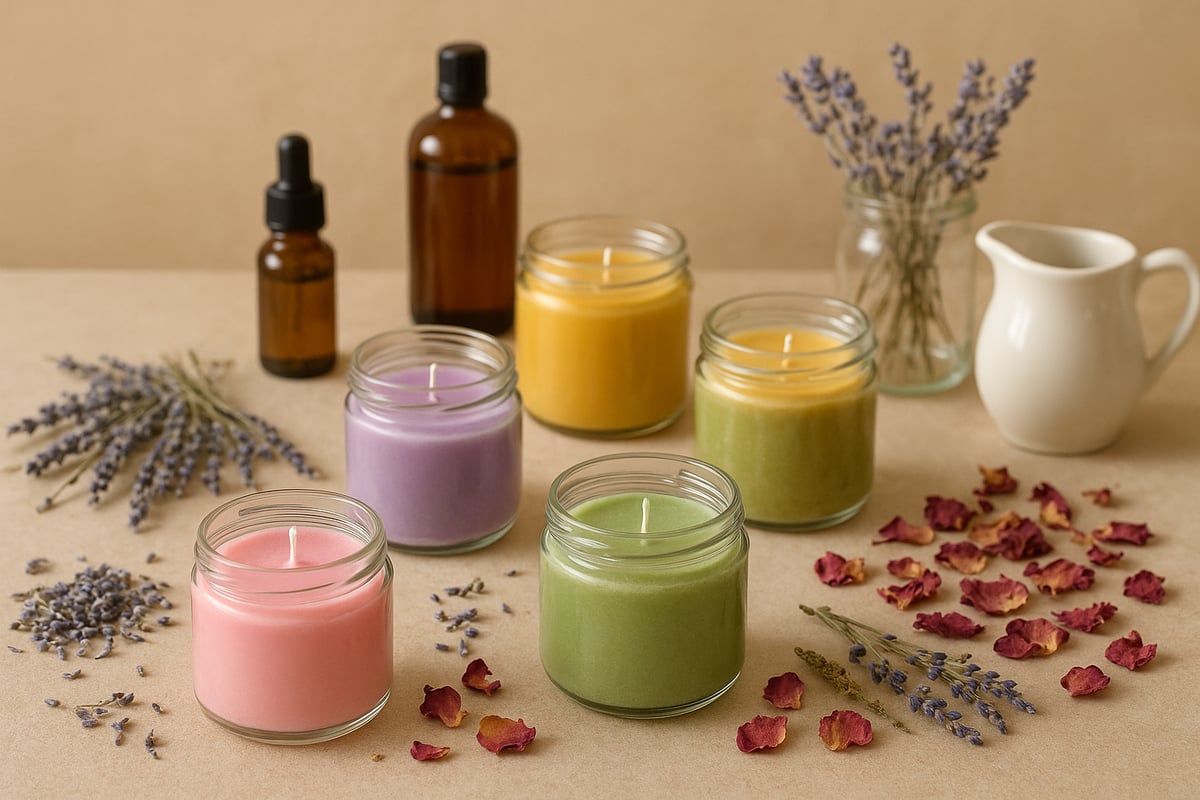
Unleash your creativity by making homemade soy wax candles uniquely yours. Customizing candles is where the fun truly begins. Why settle for ordinary when you can blend signature scents and craft a candle that reflects your personality?
Scent Blending and Botanical Additions
Start by experimenting with scent blends. Mix essential oils and fragrance oils to create complex aromas that elevate your homemade soy wax candles. Try pairing lavender with cedarwood for a calming, woodsy vibe or combine citrus with mint for an energizing effect.
Enhance your candles visually and aromatically by adding dried flowers, herbs, or decorative toppings. Sprinkle rose petals or rosemary on the surface before the wax fully sets for a beautiful, artisanal touch.
Color Techniques and Unique Containers
Bring your homemade soy wax candles to life with color. Use natural or synthetic dyes to create vibrant hues, or play with layering, marbling, and ombre effects for visual interest. Pour in stages for layered colors or swirl two shades together for a marbled appearance.
Select unique containers to make each candle stand out. Repurpose vintage glassware, mugs, or small jars for a one-of-a-kind look. Just ensure any container you use is heat-resistant and safe for candle making.
Personalization and Seasonal Inspiration
Personalize your homemade soy wax candles with custom labels, creative gift packaging, or designs that match special occasions. Think about birthdays, weddings, or holidays—your candles can become memorable gifts that show you care.
Looking for inspiration? Explore Best Christmas Candle Scents for ideas on seasonal fragrances and colors. Whether you opt for cozy winter blends or fresh spring florals, tailoring your candles to the season keeps your craft exciting.
Personalized candles are always in demand for gifts and events. With a little experimentation, you can turn every batch into a true reflection of your style.
Common Problems and Troubleshooting Tips
Even with careful preparation, homemade soy wax candles can face a few common challenges. Knowing how to identify and fix these issues will help you achieve professional-looking results at home.
Here are typical problems and quick solutions:
- Frosting: This white, chalky layer is natural with soy wax. Prevent it by pouring at lower temperatures and cooling slowly.
- Wet spots: These appear as patches on the glass. Minimize by pre-warming containers and pouring wax slowly.
- Sinkholes and cracks: Fix by using a heat gun or doing a second pour to fill gaps.
- Weak scent throw: Increase fragrance load slightly or extend curing time.
- Tunneling: Ensure the first burn melts wax to the edge and use the correct wick size.
- Soot and smoke: Trim wicks to ¼ inch and use proper containers.
If your homemade soy wax candles will not stay lit, the wick might be too short or the wax too hard. For more troubleshooting tips and detailed step-by-step fixes, check out these Candle Making Instructions: GB 464 Soy Wax.
Safety and Storage Best Practices
When making homemade soy wax candles, safety should always come first. Hot wax can cause burns, and fragrance oils may irritate skin, so wear gloves and an apron.
Work in a well-ventilated area. Open a window or use a fan to keep air fresh while you craft your homemade soy wax candles.
Store all materials, especially wax and fragrance oils, away from heat sources and direct sunlight. For best results, keep unused soy wax in airtight containers to prevent contamination.
Label your candles with clear burn instructions and safety warnings. Always keep finished candles out of reach of children and pets.
For more candle safety tips, visit Candle Care and Safety 101. Following these best practices means you can enjoy your homemade soy wax candles with peace of mind.
Now that you know all the ins and outs of making your own soy wax candles—from picking the perfect scent to troubleshooting like a pro—you’re ready to fill your home with creations that reflect your unique style. But if you want to experience the magic of expertly blended, nature inspired candles (and maybe get some inspiration for your next batch), why not treat yourself to something special? The Roosevelts Candle Co. crafts beautiful, eco friendly candles that support our national parks and plant a tree with every purchase. Ready to light up your space? Save 15% on Your First Order